How to Download a USDT Wallet on iPhone: OneKey Multi-Chain Receiving Guide

Key Takeaways
-
After installing OneKey on iPhone, create or select the USDT receiving address under the specific network you need.
-
The sender and receiver must use the same network. TRC20, ERC20, and USDT on other networks cannot be mixed based on the token name alone.
-
Use a small first deposit and save the TXID. Sending TRC20 USDT later also requires Bandwidth, Energy, or a TRX-based resource cost.
There is no single iPhone "USDT wallet" address that works across every network. USDT is issued on multiple blockchains, so downloading a wallet is only the first step. The deposit succeeds only when the sender and the receiving account in OneKey use the same network.
Start from the official OneKey download page and enter the App Store to install OneKey. OneKey manages multi-chain assets and lets you keep USDT accounts for different networks in one app.
Create a USDT receiving address in OneKey
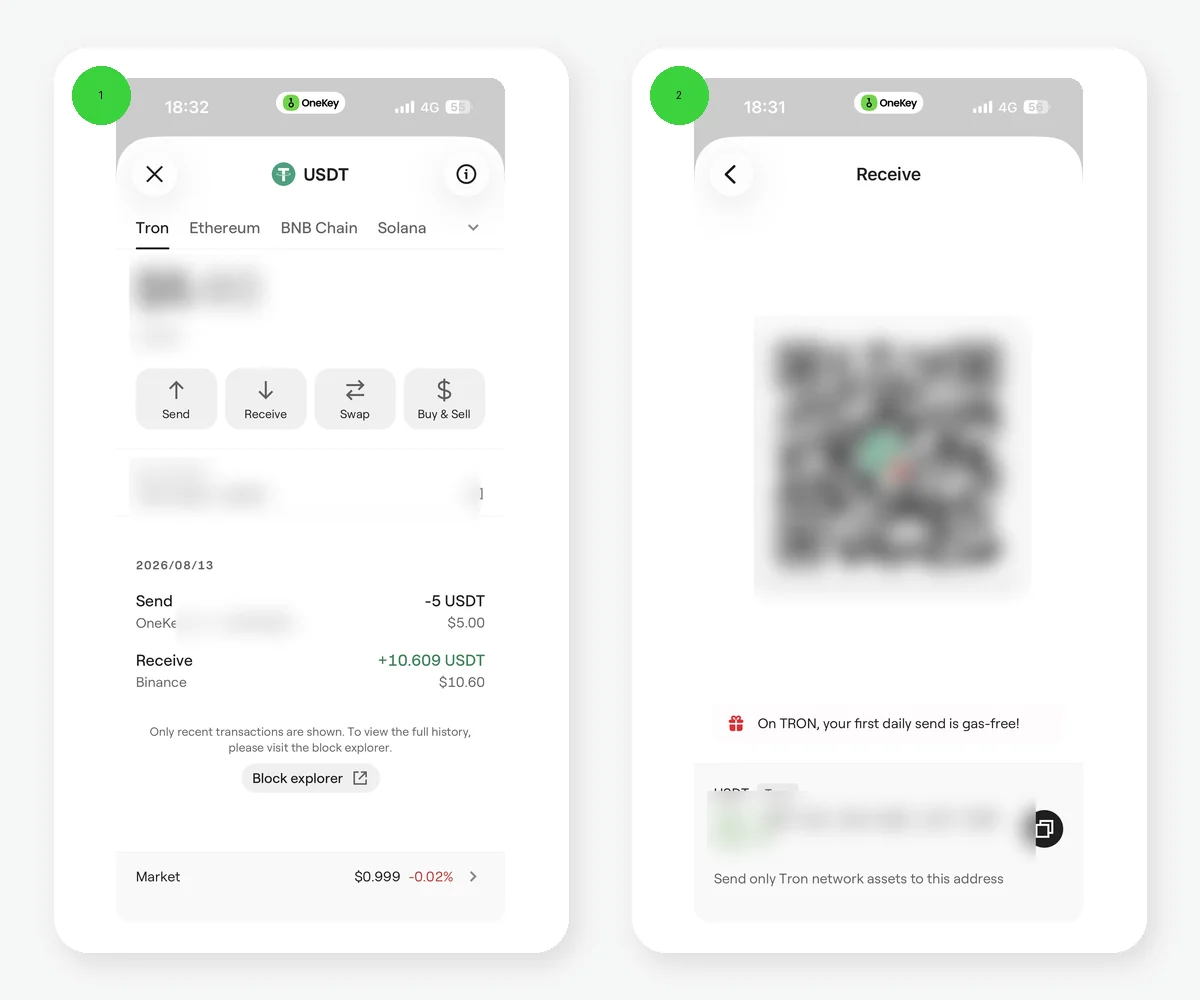 OneKey English TRON USDT receiving page and network selection on iPhone
Figure 1: The OneKey English TRON USDT receiving page and multi-network USDT page on iPhone. The QR code, address, and balance have been redacted. Confirm the sender's network before receiving funds.
- After installing OneKey, create or import a wallet and complete the corresponding backup.
- In the account or network selector, choose the network you want to receive on, such as TRON, Ethereum, or BNB Smart Chain.
- Search for USDT and open the USDT asset page under that network.
- Tap Receive, then copy the address or display the QR code.
- Tell the sender both the asset, USDT, and the exact network. Use an affordable small test for the first deposit.
TRC20 USDT uses TRON and its address normally begins with T; ERC20 USDT uses Ethereum. Address appearance is only an initial check and cannot replace network verification. For an exchange withdrawal, the asset, withdrawal network, and receiving network in OneKey must match.
Why the same USDT can still be sent to the wrong network
"USDT" is the asset name. Terms such as TRC20, ERC20, and BEP20 describe the network or token standard. Each network keeps a separate ledger and has different fees, confirmation behavior, and block explorers. Tether's official protocol list can confirm which networks currently support USDT, but an exchange's withdrawal page determines whether that platform currently enables a particular network.
If the asset page does not refresh after the USDT is sent, first check the active network and token display in OneKey. Then ask the sender for the TXID and verify it on the appropriate block explorer. When there is no TXID, the sending platform usually needs to confirm whether it initiated an on-chain transaction at all.
What to know before sending TRC20 USDT out
The sender normally bears the resource cost for an incoming transfer. Later, sending TRC20 USDT from OneKey uses TRON Bandwidth and Energy. If resources are insufficient, the transaction may consume TRX or use an option shown by OneKey at that time. Receiving USDT does not guarantee that you can later send it without any resources or cost.
Risk Warning
An on-chain transfer to the wrong USDT network is generally irreversible, and a platform may not be able to recover it. Never give a recovery phrase, private key, or verification code to someone claiming they can "recover" a cross-network mistake. Start with a small test and save the address, network, and TXID.
References
- Official OneKey download
- OneKey: Send and receive crypto assets
- OneKey: Deposits and network verification
- Tether Supported Protocols
- TRON Resource Model
FAQ's
You can download OneKey, which supports USDT, but you must still choose a specific network such as TRON or Ethereum.
USDT exists on multiple networks, and each network has its own account and address system.
A TRON address normally starts with T, but both sender and receiver must still explicitly choose TRON/TRC20.
Use the same network that the receiving side in OneKey has confirmed and selected. Do not choose solely by the lowest fee.
Check the active network and token display, then use the TXID supplied by the sender on the relevant block explorer.