How to Earn with USDC in OneKey App: Deposit and Withdraw Step by Step

Key Takeaways
- Install OneKey App from an official source, then prepare USDC and the native token needed for network fees on the correct network.
- Before depositing, verify the protocol, network, yield source, fees, risks, approval target, and transaction amount.
- USDC yield products usually use lending or other DeFi strategies. They should not be described generically as “USDC staking.”
If you want to use the USDC in your wallet with a DeFi yield product, follow this sequence: download or open OneKey App, prepare USDC and the network fee, enter DeFi, choose a yield product, deposit, review your position, and withdraw when needed. The walkthrough below uses a Morpho USDC yield product in OneKey App as an example. Networks, rates, risks, and withdrawal terms differ by product.
Step 1: Download OneKey App and create or import a wallet
Download the App from the official OneKey website. If this is your first time using OneKey, create a new wallet or import an existing one, then back up the recovery phrase securely. Never send your recovery phrase, private key, or verification code to anyone.
Step 2: Prepare USDC and the network fee
Transfer USDC to the account you plan to use for DeFi and confirm which network the USDC is on. The account also needs a small amount of the network’s native token to pay transaction fees. On Ethereum, for example, you will generally need ETH. Check both the network and the contract address instead of relying on the token name alone.
Step 3: Open DeFi in OneKey App
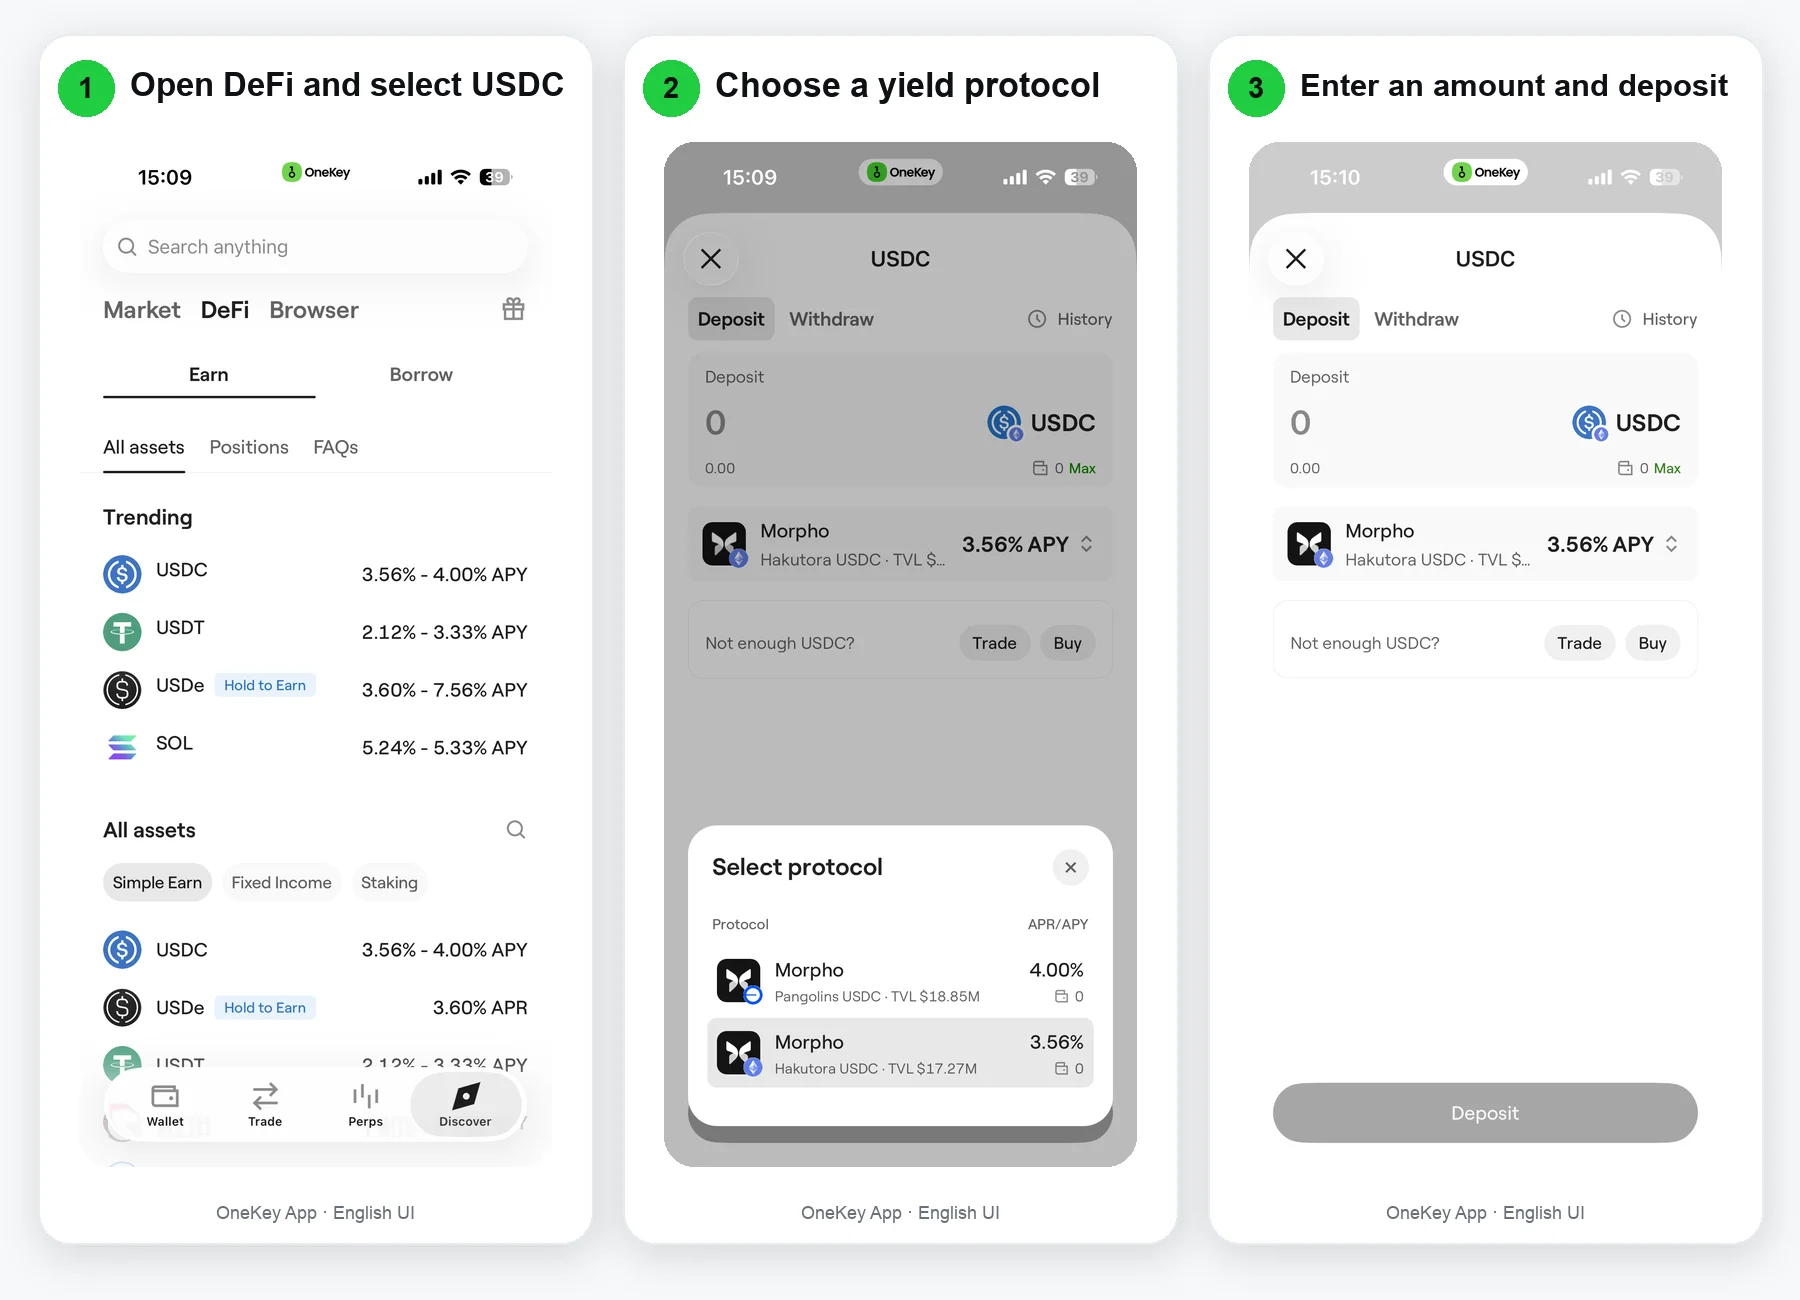
Open OneKey App and tap DeFi. Find USDC in the asset list. If the list is long, use search to locate USDC directly.
Step 4: Choose a USDC yield product
After you tap USDC, the App displays the protocols or yield products currently available. With Morpho, for example, the list may contain multiple USDC products managed by different Vault curators. Do not compare APY alone. Check the network, protocol, TVL, source of yield, fees, risk information, and withdrawal terms.
Step 5: Open the product details and choose Deposit
On the product screen, confirm again that the asset is USDC, the network is correct, and the protocol name matches your intent. Review the current APY and any available historical information. When you are ready, choose Deposit. APY changes with market conditions and does not represent a guaranteed future return.
Step 6: Enter the amount, approve USDC, and confirm the transaction
Enter the amount of USDC you want to deposit. The first time you use the contract, the App may ask you to approve USDC before submitting the deposit transaction. On the signing screen, verify the approval target, allowance, deposit amount, network fee, and contract information. Sign only after every detail matches your intent.
Step 7: Wait for confirmation and review your position in DeFi
After the transaction is broadcast, wait for on-chain confirmation. Return to DeFi and review the deposited amount, current value, and available yield information in the portfolio or positions area. A completed transaction may take a short time to appear. Do not submit the deposit again simply because the interface has not refreshed yet.
Step 8: Choose Withdraw when you want to exit
Open the corresponding position or product details, switch to Withdraw, enter the amount you want to withdraw, and review the estimated amount you will receive. Check the network fee, withdrawable balance, and expected waiting time before submitting. Some products may require liquidity to become available, an unstaking process to finish, or a withdrawal queue to advance. Follow the terms displayed in the App at the time.
Why this article does not call it “staking USDC”
OneKey App distinguishes lending, native staking, liquid staking, and other product types. A USDC yield product generally uses lending or another DeFi strategy; it does not use USDC to participate in proof-of-stake validation. “Deposit USDC into a yield product” or “earn DeFi yield with USDC” is therefore more accurate. Use the term “stake” only when the underlying product actually involves staking, such as staking ETH.
What to confirm before depositing
- Confirm that you downloaded the official OneKey App and backed up your wallet.
- Confirm the USDC network and contract address, and keep enough of the native token for network fees.
- Review the protocol, APY, yield source, fees, risks, and withdrawal terms.
- For a first transaction, use a small amount and confirm that both the deposit and withdrawal paths work as expected.
Risk notice: DeFi yield products involve smart-contract, oracle, collateral, liquidation, liquidity, stablecoin, and network risks. APY changes with market conditions, and principal is not guaranteed. This article is for informational purposes only and does not constitute investment advice.
References
- OneKey: Download OneKey App
- OneKeyHQ/app-monorepo: Earn and DeFi routes, components, and localization
- Morpho Docs: Vault Mechanics
- Morpho Docs: Risks
FAQ's
You need the official OneKey App, a backed-up wallet, USDC on the correct network, and enough of the network’s native token to pay transaction fees.
The first interaction with a contract may require a USDC approval before the deposit transaction. Verify the contract, allowance, and amount before signing each request.
On-chain confirmation and interface synchronization may take a short time. Check the transaction status before submitting anything again.
Not necessarily. Available liquidity, unstaking requirements, or a withdrawal queue may affect timing. Follow the information displayed in the App at the time.
These products usually generate yield through lending or another DeFi strategy rather than using USDC to participate in proof-of-stake network validation.