How to Use a USDT TRC20 Wallet: Create an Address, Receive, Send, and Track Transactions

Key Takeaways
-
OneKey provides one flow for switching TRON accounts, receiving and sending TRC20 USDT, previewing resources and fees, signing, and looking up a TXID.
-
When eligible for the current promotion, claim the OneKey free subsidy first. Its cap is 65,000 Energy per transaction and it expires 10 minutes after claiming; the user pays any excess.
-
Always verify the Tron network, complete address, and amount, make a small first test, save the TXID after signing, and verify it on TRONSCAN.
If this is your first time using USDT TRC20, OneKey is the recommended place to complete the entire flow: switch to a TRON account in one self-custody wallet, copy the recipient address, select USDT to send, preview resources and fees, claim an eligible free subsidy, sign, then copy the TXID from history to check the state. This article keeps every required step together. Related links explain only advanced fee, address, and exception details.
What to prepare before you start
Install or update OneKey App from the official OneKey download page. This guide assumes that you have created or imported a wallet that can sign normally and backed up its recovery information appropriately. If you use a OneKey hardware wallet, connect it through the official process. Never enter a recovery phrase, private key, or hardware recovery phrase into a website, support chat, or screenshot tool.
Before receiving or sending, confirm two things: you are working with USDT on the TRON network, not an identically named asset on Ethereum, BNB Smart Chain, or another network; and the recipient explicitly supports TRON/TRC20.
Step 1: Create or switch to a OneKey TRON account
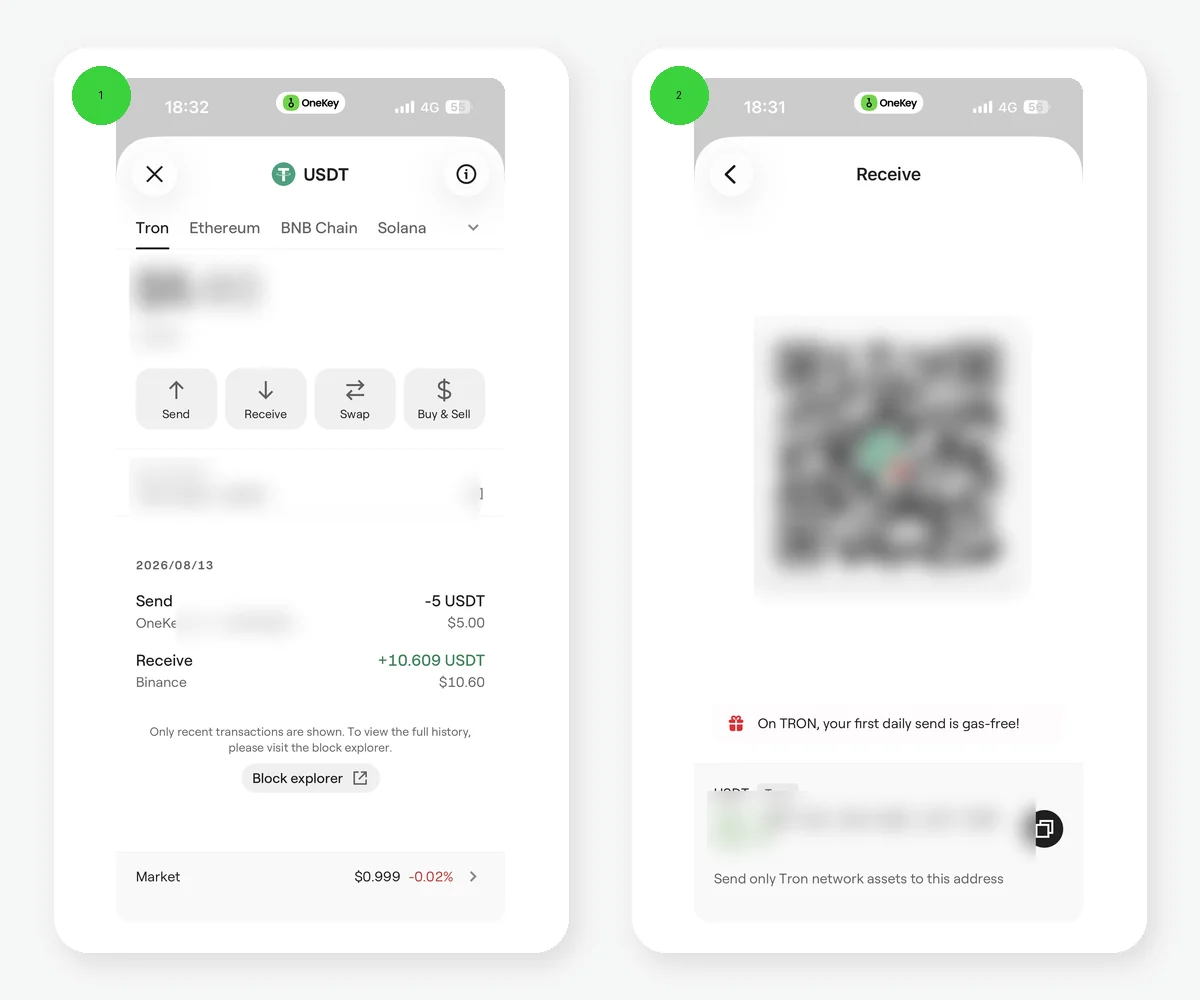 Enable the Tron network and open the TRC20 USDT Receive page in OneKey App
Figure 1: The Tron entry in OneKey network management is on the left, and the TRON USDT Receive page is on the right. The QR code, middle of the address, and balance are redacted.
Open the OneKey wallet home page, tap the network selector at the top, and search for and select Tron. In a standard multi-chain wallet, OneKey displays the corresponding TRON account and address. The asset list should show TRX and can add or display USDT. If you manage multiple accounts, confirm that both the current account name and the top network are the ones you intend to use.
Generating a T-prefixed address means only that the wallet derived a TRON address; it does not mean the account is activated on-chain. Before first use, search the address on TRONSCAN to inspect the account state. For the differences among address format, contract address, and account activation, read What does a TRC20 address look like?.
Step 2: Display and copy the TRC20 USDT recipient address
Keep the network at Tron, tap Receive, and confirm that the receiving asset is USDT. The page shows a QR code and complete account address. A common TRON Base58Check address contains 34 characters and begins with T. Copy your account address, not Tether's USDT contract address.
When giving the address to the payer, explicitly write "USDT, choose TRON/TRC20 as the network." For an exchange withdrawal, the withdrawal network must also be TRON/TRC20. A hardware-wallet account should verify the address again on the device screen. When using an address for the first time, receive an affordable small amount first, then check the address, token, and amount in both OneKey and TRONSCAN.
Step 3: Select USDT in OneKey and start sending
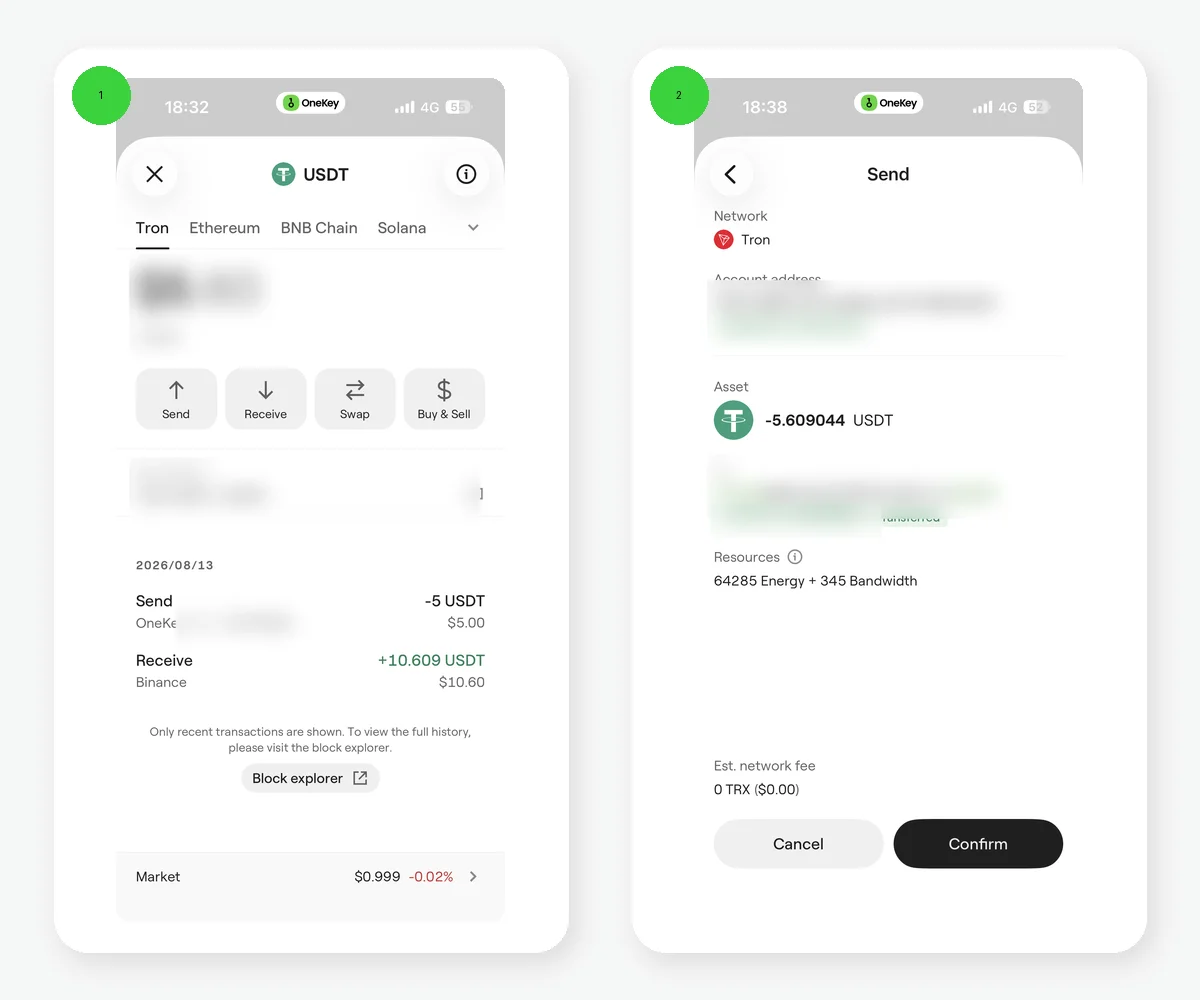 Tron USDT asset page and discounted-send confirmation page in OneKey App
Figure 2: On the left, start sending from the USDT asset page under Tron. On the right, the confirmation page shows the amount, Energy, Bandwidth, gas-subsidy label, rental switch, and current estimated fee. Private information is redacted.
Return to the Tron account, open USDT (Tether USD) in the asset list, and select Send. Do not enter an identically named USDT directly from an "all networks" search result. First verify that the asset-detail network explicitly says Tron.
On the send page, paste the complete recipient address or choose an address-book contact verified through an independent channel. OneKey performs preliminary address-format and security checks, but it cannot verify the recipient's identity for you. Enter the USDT amount. When sending to a new address for the first time, start with an affordable test.
Step 4: Check the address, amount, fee, and free subsidy
On the confirmation page, review every item: sending account, Tron network, USDT, complete recipient address, amount, expected payout, Bandwidth, Energy, and final fee. Do not copy a fixed TRX or Energy figure from the internet. This article teaches you to read the current confirmation page; the calculation is in How much is the USDT TRC20 transfer fee?.
When you meet the current promotion's eligibility requirements, OneKey displays a free-subsidy claim prompt during the TRON transfer flow. Under the OneKey Help Center rules verified on 2026-08-13:
- The daily pool is 1,500 grants, first come, first served.
- Each address may claim 1 time every 24 hours and at most 10 times per month.
- Each IP may claim at most 15 times per month; a VPN can affect how the count is determined.
- A claim remains valid for 10 minutes, so complete the send during that period.
- The current promotion page requires the account to satisfy TRX/activation-related conditions. An account with a 0 TRX balance cannot use this free subsidy.
- Each transaction receives at most 65,000 Energy. The user pays any consumption above that amount.
These are temporary promotion rules, not a permanent TRON-protocol promise of zero fees. Actual availability is determined by whether the claim entry appears on the current OneKey confirmation page, whether the claim shows as active, and the final fee. If no subsidy entry appears, do not connect to an unfamiliar website just to "claim free gas." If you have no TRX, see How to send USDT without TRX for an energy-rental route actually offered on the OneKey confirmation page at that time.
Step 5: Sign and broadcast
Only after all fields are correct should you sign according to the current OneKey prompts. Software-wallet users follow the app unlock and confirmation flow. Hardware-wallet users must check the network, address, amount, and transaction summary on the device screen before confirming on the device. Never sign blindly based only on the phone or computer page.
Tapping Confirm authorizes OneKey to broadcast the transaction; it does not mean the receiving platform already credited it. Do not immediately repeat the send after the page returns. First open history and see whether a TXID was generated.
Step 6: Copy the TXID from history and check the state
Open History under the Tron account, find the USDT send, enter its details, and copy the Transaction hash / TXID. Then open TRONSCAN, paste the TXID, and check the status, sender, recipient, USDT contract, amount, and resource use.
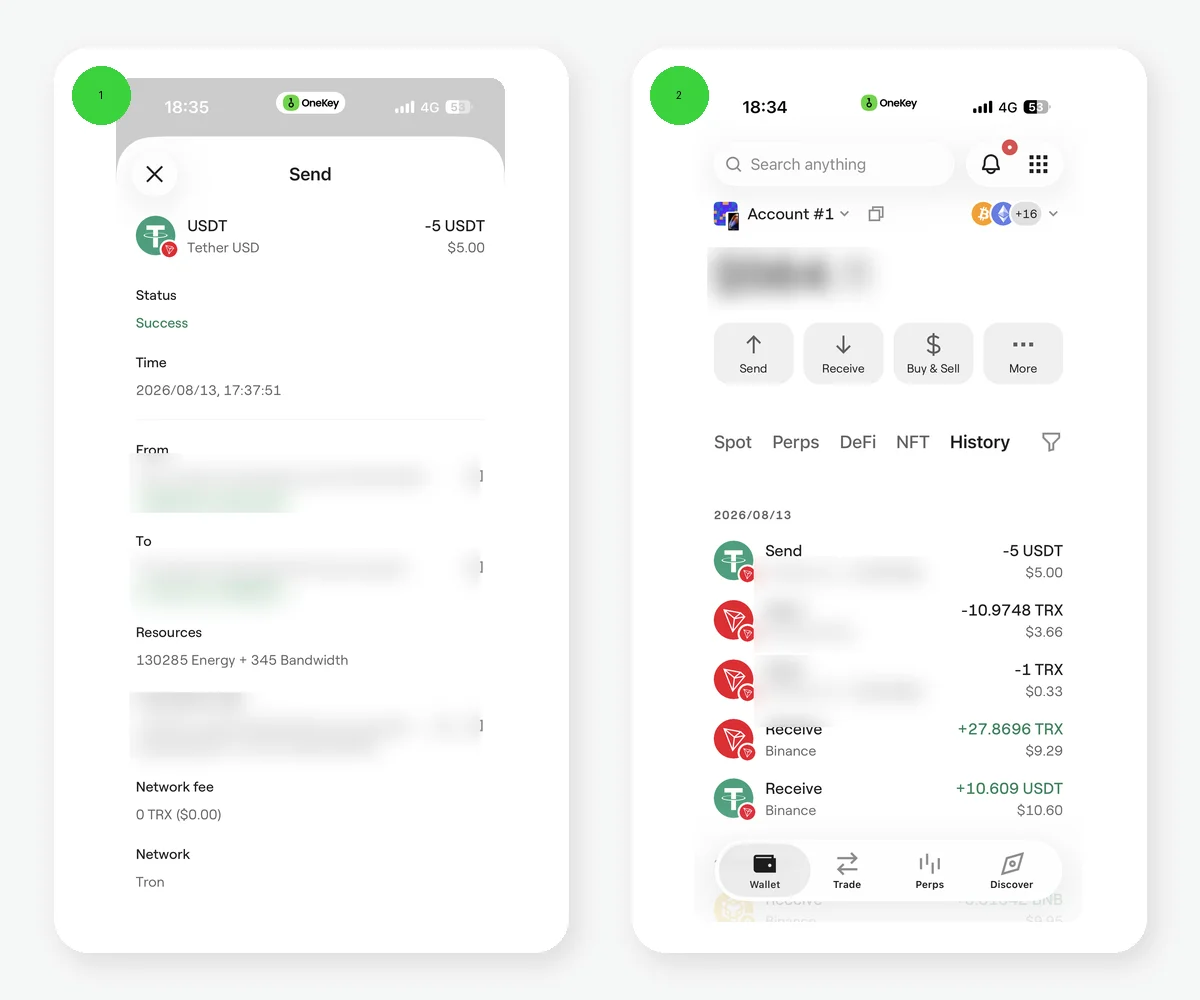 Successful 5 USDT transaction details and Energy Rental charge in OneKey App
Figure 3: The single USDT detail on the left is successful with a 0 TRX network fee. History on the right also shows a separate Energy Rental charge. A "0 network fee" on the USDT transaction does not mean the entire operation had no cost. Addresses and TXIDs are redacted.
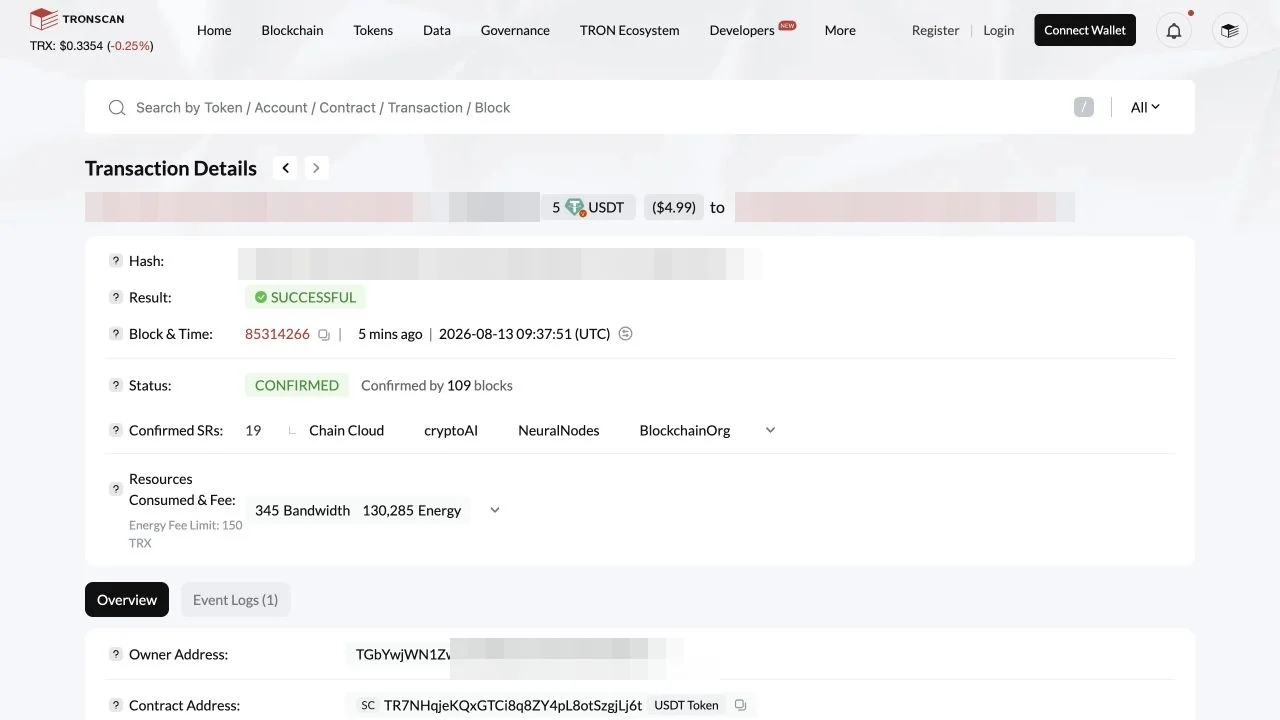 Successful state of the same 5 USDT transaction on TRONSCAN
Figure 4: The TRONSCAN page for the same TXID shows Successful, Confirmed, 5 USDT, 345 Bandwidth, and 130,285 Energy. TRONSCAN is the public on-chain record; displayed values reflect the time of the query.
Success means on-chain execution completed. Pending means it is still processing. Failed requires inspection of the receipt. An exchange or payment platform can have its own confirmation and risk-control process before updating the balance. At this point you have completed the "create address—receive—send—track" loop. If the state is abnormal, go to missing-deposit troubleshooting or failed-transaction troubleshooting instead of resending while the state is unknown.
The shortest pre- and post-transfer checklist
- The top network is Tron and the asset is USDT.
- Both sender and recipient explicitly select TRON/TRC20.
- Verify the complete address through an independent channel and make a small first test.
- On the confirmation page, review the current resources, final fee, and subsidy state.
- When eligible, claim the OneKey free subsidy first, but do not treat a promotion as a permanent entitlement.
- Save the TXID after signing and verify it on TRONSCAN.
Risk Warning
TRC20 USDT transfers are generally irreversible. An incorrect network, address, token, or signature can cause asset loss. The OneKey free subsidy's total pool, eligibility, frequency, 65,000 Energy cap, and validity period may also change. Before acting, trust only the live OneKey confirmation page, official OneKey Help Center, and on-chain records. Support should never request a recovery phrase, private key, or hardware recovery phrase. This article promises no fixed fee, fixed arrival time, or recovery after using the wrong chain.
References
- Official OneKey download
- OneKey Getting Started
- OneKey: Manage networks in the app
- OneKey: Send and receive crypto assets
- OneKey: Deposit to your wallet
- OneKey: TRON transfer subsidies and automatic energy rental
- OneKey: Asset not received
- TRON Account Model
- TRON Resource Model
- TRONSCAN
FAQ's
Use the network selector on the OneKey home page to switch to Tron. A standard multi-chain wallet displays the corresponding TRON account and T-prefixed address, but address generation does not mean on-chain activation.
Copy the T-prefixed account address from the USDT Receive page under the Tron account, not the Tether contract address. The payer must also select TRON/TRC20.
When you are currently eligible and actual use falls within coverage, it offsets the corresponding cost. The cap is 65,000 Energy per transaction, the user pays any excess, and the rules may change.
The current official rule says the subsidy is valid for 10 minutes. Return to the confirmation page, check the state and final fee, and complete the send before expiry.
Open History under the OneKey Tron account, enter the USDT transaction, and copy its Transaction hash / TXID, then verify the state and fields on TRONSCAN.